Table of Contents
What is Audacity?
Audacity is an impressive free open-source software for recording and editing sounds. That was initially released in the year 2000 .
You can use Audacity for various tasks such as recording, noise reduction, mixing audio clips, editing, adding effects, conversing audio files, and more.
So, if you are a vlogger, podcaster, audio producer, video producer, or just work with audio sound, it’s a great tool for you. It’s very lightweight anAmazing free open-source software for sound recording and editing is called Audacity. That was first made available in 2000.
Audacity can be used for a range of purposes, including recording, noise reduction, combining audio clips, editing, adding effects, and more.
Therefore, it’s a terrific tool for you if you are a vlogger, podcaster, audio producer, video producer, or just work with audio sound. It can run Windows and is incredibly lightweight. Linux, Mac, or PC.
I’ll go through Audacity usage today.
The initial query posed by everyone How Easy Is It to Use?d it can run windows. Mac, PC, or Linux.
today I will cover how to use Audacity.
The first question people always ask Is It Hard to Use?
Audacity: Is It Hard to Use?
Audacity could seem intimidating if you’re just getting started in the field of audio editing. However, anyone who has only dabbled in audio editing should be able to utilise Audacity on a Mac or Windows computer. Let’s quickly review Audacity’s user interface.
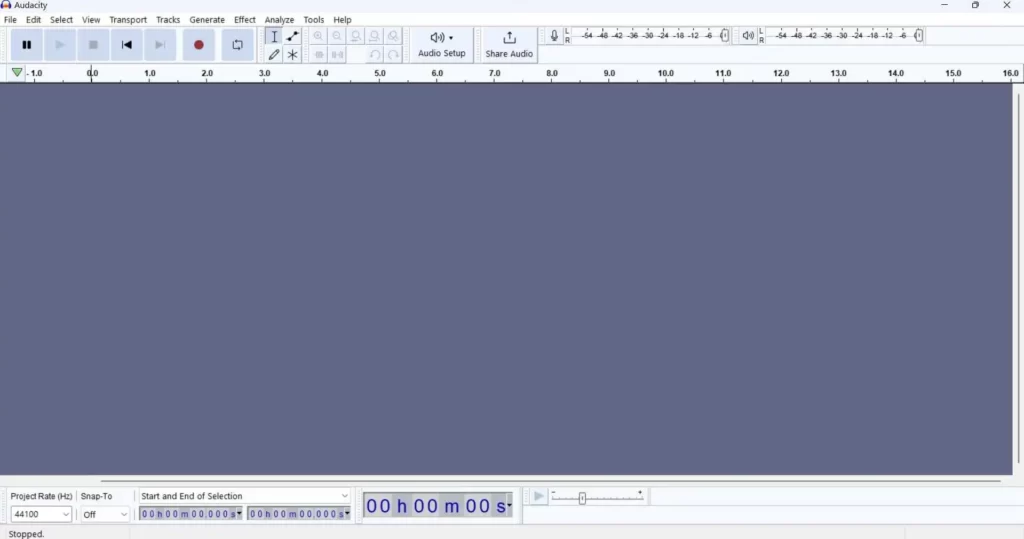
Utilizing Audacity is quite simple. The menu system in Audacity is relatively simple to use, and it is marked on the top bar. The most recent version of Audacity, 3.2, makes all features very simple to access.
How to Use Audacity?
Learn how to use Audacity on Windows 7/8/10/11, as well as on Linux and Mac, by following the steps listed below.
Step 1: Import the file which you want to edit.
To import an audio file select File > Import > Audio.
For a quicker method, just drag and drop the files into the Audacity blank area.
see image for better clearity
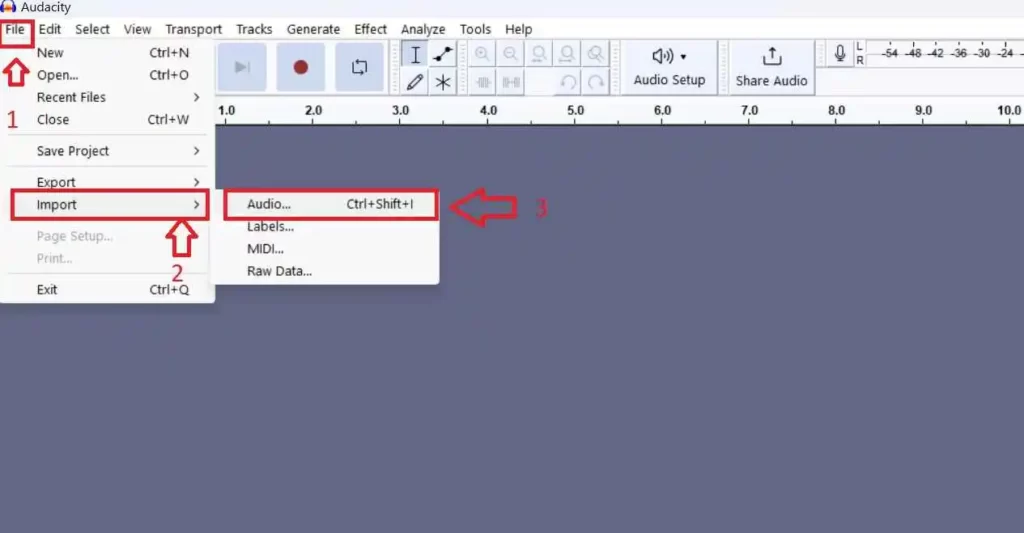
Importing an audio file into Audacity will be the first step. Common audio formats like WAV, MP3, OGG, and AIFF are supported. Install the FFmpeg library if you require more formats.
Step 2: Check the waveform
A screenshot of Audacity is shown below. Where the waves are closer to the top or bottom (decibel+1 and -1) or reach them, the audio is louder. The length of the audio clip is shown by the ruler.
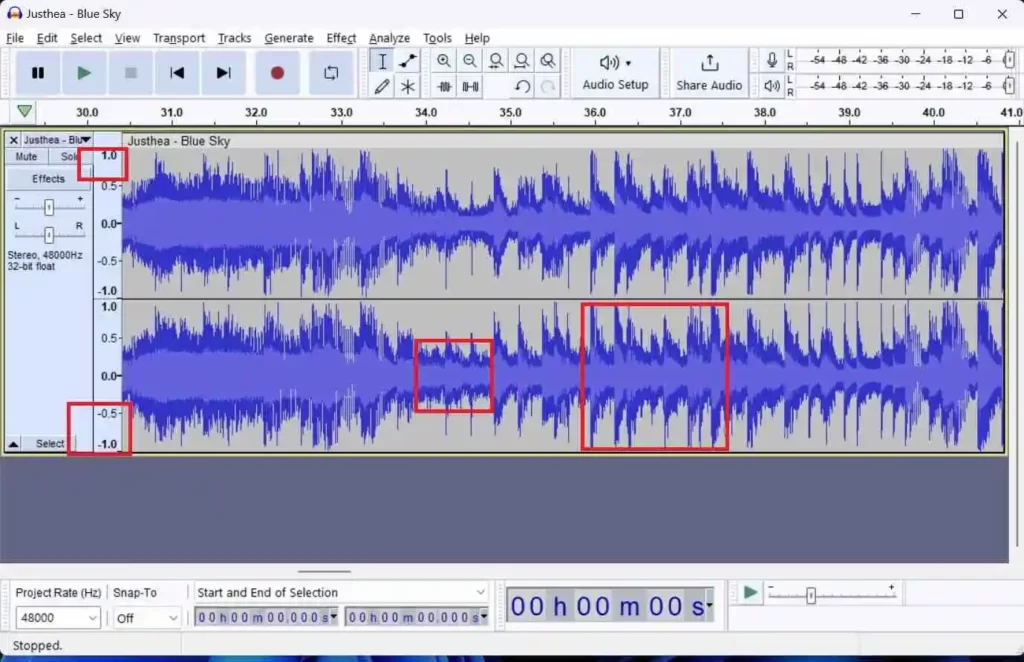
DC bias, which is defined as a waveform that is not centred on the horizontal line at 0.0 amplitude, should be looked for in the waveforms. The majority of the time, it results from recording using a bad audio interface.
For the DC bias to be eliminated, select the clip and choose Normalize.
Use the Space button to play and pause the audio while you listen to it.
You can also play and pause by selecting them from the play and stop menus, or you can use the Space button as a shortcut.
Step 3:how cut past and zoom the track in Audacity
To replace any part of your audio clip, first, select the part you want to replace. You can cut, copy, paste and duplicate just like you can edit any selected text.
The Audacity tools toolbar is displayed in the image above. Therefore, how does Audacity zoom a track? By using the + and – buttons, as indicated in the figure, you may use the magnifier to zoom in and out (blue)
Zoom in and out with the mouse wheel and the colour blue.
Cut and paste in red (Control + C, Control + V)
Step 4:How to trim audio in Audacity?
If the audio is still playing make sure to press Space to stop it. Select the part you want to delete. Just simply press the delete button from the keyword
Step 5:how to noise reduction in audacity
First of all, you have to choose a place where there is a lot of noise and where you do not speak anything.
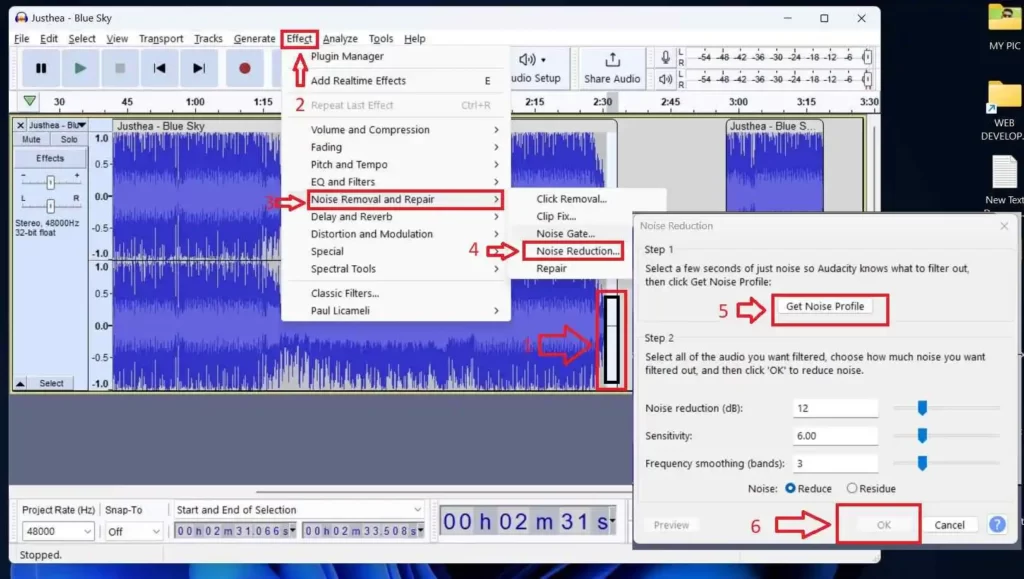
Effect> Noise removal and repair> Noise reduction> Get noise profile
This time select all waveforms and follow all 4 steps in the image .finaly press ok(6)
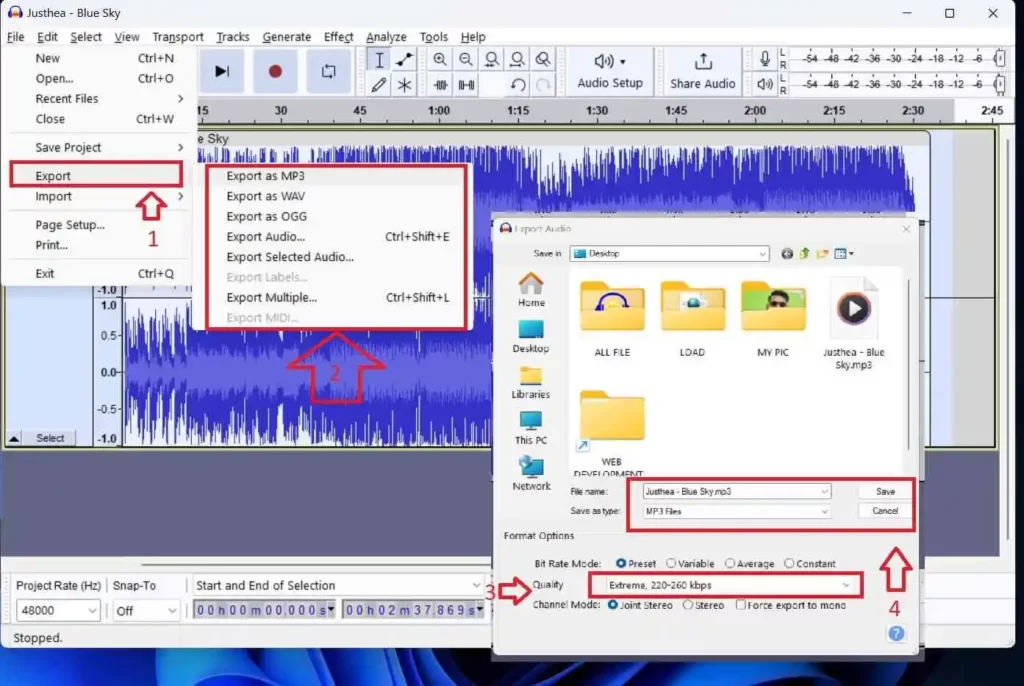
Step 6: Export the file in audiocity
FILE > EXPORT > SLECT THE FORMATE (MP3,WAV,OGG) > CHANGE QUALIY OF SAVING FILE > SAVE
If you want to learn more software then click on the given link
🌟 Unleash the Digital Power with Devendra Gupta 🌟
🖥️ Tech Enthusiast |Software Reviewer| Blogging Expert | SEO Guru |
Web developer 📊
🔍I tested hundreds of Software and reviewed


