Table of Contents
What Is Teamviewer?
TeamViewer is one of the most popular remote desktop software in the world, used by millions of people to access their computers and share their screens with others. It is a versatile tool that can be used for personal or professional purposes, and is compatible with a wide range of devices, including Mac computers. In this article, we will explore TeamViewer for Mac and how it can be used to facilitate remote access and collaboration.
Getting started with TeamViewer for Mac
The first step to using TeamViewer on your Mac is to download and install the software. You can do this by visiting the TeamViewer website and selecting the Mac version of the software. Once downloaded, follow the instructions to install the software on your computer
Once you have installed TeamViewer, you will need to create an account. This will allow you to use the software to remotely access other computers and share your own screen with others. You can create an account for free, or choose one of the paid options if you need additional features or support.
Using TeamViewer for remote access
One of the primary uses of TeamViewer is for remote access. This allows you to access your own computer from another location, or to provide remote assistance to others. To use TeamViewer for remote access, you will need to install the software on both the computer you want to access remotely, and the computer you will be using to access it.
Once both computers have TeamViewer installed, you can connect them using the unique ID and password generated by TeamViewer. Simply enter the ID and password of the remote computer into the TeamViewer interface on your local computer, and you will be able to control the remote computer as if you were sitting in front of it.
Using TeamViewer for screen sharing and collaboration
In addition to remote access, TeamViewer can also be used for screen sharing and collaboration. This is particularly useful for business meetings, presentations, and other situations where you need to share your screen with others.
To use TeamViewer for screen sharing, simply select the option to share your screen from the main interface. You can then choose which screen or window to share, and invite others to view your screen by providing them with a link or access code.
TeamViewer also includes a number of collaboration features, such as the ability to share files and chat with other users. This can be useful for working on projects with remote team members, or for providing support to customers or clients.
TeamViewer pricing ?

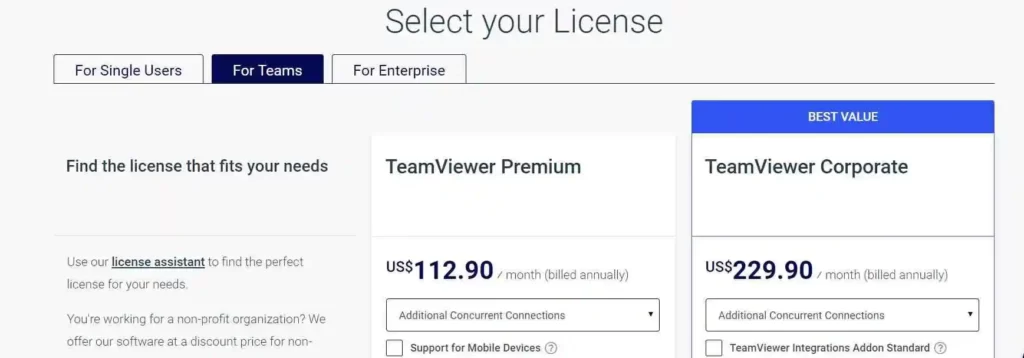
TeamViewer offers several pricing plans to meet the needs of different types of users, from individual users to businesses of all sizes. Here is a breakdown of the pricing plans:
Free: TeamViewer offers a free version of their software for personal use that allows you to use all the basic features, such as remote control, file transfer, and chat.
Premium: This plan is designed for larger businesses and starts at $112 per month, billed annually. It includes all the features of the Business plan, as well as advanced features like user management, custom branding, and device access reporting.
Corporate: This plan is designed for enterprise-level businesses and starts at $230 per month, billed annually. It includes all the features of the Premium plan, as well as advanced security features like two-factor authentication, trusted device lists, and audit logging.
FAQ For TeamViewer
1.What is TeamViewer and how does it work?
TeamViewer is a remote desktop software application that allows users to access and control devices from anywhere in the world. It is a versatile tool used for personal or professional purposes to remotely access and control devices, collaborate with others, and provide technical support.
To use TeamViewer, both the local and remote devices must have the software installed. The user on the local device then enters the ID and password generated by TeamViewer for the remote device to connect to it. Once connected, the user on the local device can control the remote device as if they were physically present in front of it.
TeamViewer also provides features for online meetings and webinars, allowing users to share their screens and collaborate with others in real-time. It is a secure and safe software application that uses advanced encryption and authentication mechanisms to protect the data being transferred between devices.
2.How can I download and install TeamViewer on my device?
Go to the TeamViewer website at www.teamviewer.com.
Click on the “Download for Free” button on the homepage.
Choose the version of TeamViewer you want to download, such as “Windows” or “Mac”, and click on the “Download TeamViewer” button.
Once the download is complete, double-click on the downloaded file to begin the installation process.
Follow the on-screen instructions to install TeamViewer on your device. The installation process may vary depending on your operating system and version of TeamViewer.
Once the installation is complete, launch TeamViewer from your desktop or applications folder.
If you are using TeamViewer for personal purposes, you can choose the “Personal / Non-commercial use” option when prompted to select a license type. If you are using TeamViewer for commercial purposes, you will need to purchase a license.
To start using TeamViewer, you will need to create a TeamViewer account. You can sign up for a free account by entering your email address and creating a password.
Once you have logged in to your TeamViewer account, you can start using the software to remotely access and control devices, collaborate with others, and provide technical support.
3.Is TeamViewer secure and safe to use?
Yes, TeamViewer is a secure and safe software application that uses advanced encryption and authentication mechanisms to protect the data being transferred between devices. It has several security features that ensure that your remote connections are secure and private.
TeamViewer uses end-to-end encryption and RSA public/private key exchange to secure all data transmissions between devices. This means that all data is encrypted at the sending device and can only be decrypted at the receiving device, making it impossible for anyone to intercept and read the data in transit.
In addition, TeamViewer provides various authentication mechanisms, including two-factor authentication and trusted device lists, to prevent unauthorized access to remote devices. The software also uses anti-virus and anti-malware protection to ensure that your devices are not compromised during remote sessions.
TeamViewer is also compliant with various industry standards and regulations, such as GDPR, HIPAA, and SOC2, which ensures that your data is protected and managed in accordance with the highest security standards.
4.What are the features of TeamViewer and how can I use them?
TeamViewer offers a wide range of features including remote access, file transfer, online meetings and webinars, remote printing, chat and messaging, and mobile device support. These features can be used to remotely access and control devices, collaborate with others, and provide technical support.
5.Can TeamViewer be used on mobile devices?
Yes, TeamViewer can be used on mobile devices such as smartphones and tablets. TeamViewer offers mobile apps for both Android and iOS devices, which allow you to remotely access and control other devices from your mobile device. With the mobile app, you can remotely access your desktop computer, share files, and participate in online meetings or webinars from your mobile device. The mobile app also allows you to remotely support and troubleshoot mobile devices, making it a versatile tool for both personal and professional use.
6.How to uninstall teamviewer from mac
Open the Finder application.
Navigate to the “Applications” folder.
Locate the TeamViewer application and drag it to the Trash.
Alternatively, you can right-click on the TeamViewer application and select “Move to Trash”.
Once the TeamViewer application is in the Trash, right-click on the Trash icon in the Dock and select “Empty Trash”.
You may be prompted to enter your administrator password to complete the uninstallation process.
Once the Trash has been emptied, TeamViewer will be completely uninstalled from your Mac.
7.How to uninstall teamviewer from Windows
To uninstall TeamViewer from Windows, follow these steps:
Click on the “Start” button and open the “Control Panel”.
In the Control Panel, click on “Programs and Features” (or “Uninstall a program”, depending on your version of Windows).
Locate “TeamViewer” in the list of installed programs.
Click on “TeamViewer” to select it, then click on the “Uninstall” button.
Follow the on-screen instructions to complete the uninstallation process.
Once the uninstallation process is complete, restart your computer.
You may also want to delete any leftover files or folders related to TeamViewer manually. To do this, navigate to the “Program Files” or “Program Files (x86)” folder and look for the “TeamViewer” folder. If you find it, delete it.
FINAL WORD
TeamViewer is a powerful and versatile tool that can be used for a wide range of purposes, from remote access to screen sharing and collaboration. With its user-friendly interface and compatibility with Mac computers, it is a popular choice for individuals and businesses alike. Whether you need to access your own computer from another location, or collaborate with others on a project, TeamViewer can help you stay connected and productive.
🌟 Unleash the Digital Power with Devendra Gupta 🌟
🖥️ Tech Enthusiast |Software Reviewer| Blogging Expert | SEO Guru |
Web developer 📊
🔍I tested hundreds of Software and reviewed


